Tuesday 18 October 2011

Stomp 1.1 Support in HornetQ

HornetQ now supports the Stomp 1.1 protocol and will be available in the next release, for now though it is part of trunk in the SVN repository.
Stomp 1.1 specification is an update to Stomp 1.0 and is backward compatible. New features include protocol negotiation, heartbeat, the NACK frame and virtual hosting.

An example 'stomp 1.1' is also available in the SVN repository which demonstrates a stomp client that uses one of the new features 'protocol negotiation', lets take a look at the example now.

1. Configuring a HornetQ Stomp Server

First of all we need to configure the server to allow stomp connections by adding a stomp acceptor, this is the same as stomp 1.0.
<acceptor name="stomp-acceptor">
<factory-class>org.hornetq.core.remoting.impl.netty.NettyAcceptorFactory</factory-class>   
<param key="protocol" value="stomp" />
<param key="port" value="61613" />
</acceptor>
2. Connection Negotiation

Once the HornetQ Stomp server is up and running, it is up to the Stomp client to decide which Stomp specification to use to communicate with HornetQ. This is done by connection negotiation. The Stomp1.1 example shows how to do this
// Step 1. Create a TCP socket to connect to the Stomp port
Socket socket = new Socket("localhost", 61613);

// Step 2. Send a CONNECT frame to connect to the server
String connectFrame = "CONNECT\n" +
"accept-version:1.1\n" +
"host:localhost\n" +
"login:guest\n" +
"passcode:guest\n" +
"request-id:1\n" +
"\n" +
END_OF_FRAME;

sendFrame(socket, connectFrame);

In the above code you can see that the client sends a CONNECT stomp frame with the accept-version set to 1.1, this tells the server that the client is using the 1.1 protocol.
Also new to 1.1 is the host header which is used to configure the virtual host to use, although HornetQ supports setting the header it doesn't support virtual hosts. All other headers are standard Stomp 1.0 headers.

If the server accepts the connection request, it will return a 'CONNECTED' stomp with a 'version' header whose value is 1.1. The example prints this to the console:
...
[java] response: CONNECTED
[java] version:1.1
[java] session:1337300467
[java] server:HornetQ/2.2.5 HornetQ Messaging Engine
[java] response-id:1
...
3. Sending and receiving messages.
Once connected, the client can send and receive Stomp messages with the connection. The example illustrates how to send a stomp message:
// Step 3. Send a SEND frame (a Stomp message) to the
// jms.queue.exampleQueue address with a text body
String text = "Hello World from Stomp 1.1 !";
String message = "SEND\n" +
 "destination:jms.queue.exampleQueue\n" +
 "\n" +
 text +
 END_OF_FRAME;
sendFrame(socket, message);
You can see this is very much the same as a Stomp 1.0 client. The message will be sent to the destination 'jms.queue.exampleQueue'. For the mapping of destination headers to HornetQ jms addresses please refer to the HornetQ's User Manual.
Note: Please pay attention to the leading and trailing spaces in the headers. Stomp 1.0 usually trims off the spaces before processing. But in Stomp 1.1, those spaces are preserved. So in Stomp1.1 unnecessary spaces in headers may result in strange errors which is difficult to find.

4. Enabling Heartbeats

One important feature added to Stomp 1.1 is the heartbeats used to monitor the underlying connection. The heart-beating is established at connection time, using a special header 'heart-beat' in CONNECT frame. For example:
CONNECT
accept-version:1.1
host:127.0.0.1
login:guest
passcode:guest
heart-beat:500,1000

Once connected with the above frame, the HornetQ server will make sure that a stomp frame (or a heartbeat byte) is sent to the client every 1 second (1000 milliseconds). Meanwhile the client should send a stomp frame (or a heartbeat byte) for every 500 milliseconds.
HornetQ server will deem a connection to be broken if it hasn't receive a stomp frame from the client via this connection for a time longer than 2 times of the client heart-beat interval (i.e. 2*500). So for the above case, if it hasn't receive any frame within a second, the server will close the connection.

Note: HornetQ specifies a minimum value for both client and server heart-beat intervals. The minimum interval for both client and server heartbeats is 500 milliseconds. That means if a client sends a CONNECT frame with heartbeat values lower than 500, the server will defaults the value to 500 milliseconds regardless the values of the 'heart-beat' header in the frame.

The HornetQ 1.1 implementation also has several performance improvements however we will continue to improve this over the coming months.

For more information read the stomp specification

Thursday 1 September 2011

HornetQ on JBoss AS7

Now that JBoss AS 7.0.1 has been released which includes messaging and MDB's I thought we would write a quick tutorial on how to get started deploying JMS resources and MDB's.

We have recently blogged about our achievements on SpecJMS and EAP 5.1.2 and of course the version shipped with AS7 has all the same functionality and performance levels that are available in the EAP platform.

This tutorial will demonstrate how HornetQ is configured on AS7, I Will explain the main concepts of how to configure HornetQ server configuration and JMS resources and also provide an example MDB that we can run. So first of all you will need to download AS7 from here.

Make sure you download the 'everything' version as the web profile does not contain messaging or MDB's by default.

In AS7 there's is a single configuration file, either standalone.xml or domain.xml, which is broken into subsystems. These files are pretty much identical although there are differences however this is beyond the scope of this article. For more information on AS7 and its configuration take a look at the AS7 users guide here.

By default the messaging subsystem isn't enabled however a preview configuration is provided that does contain a messaging subsystem. these are standalone-preview.xml and domain-preview.xml, for this tutorial we will use the standalone-preview.xml. To run the preview configuration simply execute the command from the bin directory:


./standalone.sh --server-config=standalone-preview.xml

You should see the HornetQ server started along with some JMS resources, quick wasn't it. Now lets take a closer look at the messaging configuration itself. Each subsystem has its own domain named that is defined by a schema, the schema for the messaging subsystem can be found in docs/schema/jboss-as-messaging_1_0.xsd in the AS7 distribution.

 If you search for jboss:domain:messaging in the standalone-preview.xml you will find the HornetQ subsystem configuration.

If you have used HornetQ standalone or in JBoss 6 you will be familiar with some of the configuration. The first part is basically the same as in the hornetq-configuration.xml file. This looks like:

<!-- Default journal file size is 10Mb, reduced here to 100k for faster first boot -->
<journal-file-size>102400</journal-file-size>
<journal-min-files>2</journal-min-files>
<journal-type>NIO</journal-type>
<!-- disable messaging persistence -->
<persistence-enabled>false</persistence-enabled>

<connectors>
<netty-connector name="netty" binding="messaging">
<netty-connector name="netty-throughput" binding="messaging-throughput">
   <param key="batch-delay" value="50">
</netty-connector>
<in-vm-connector name="in-vm" id="0">
</in-vm-connector>

<acceptors>
<netty-acceptor name="netty" binding="messaging">
<netty-acceptor name="netty-throughput" binding="messaging-throughput">
   <param key="batch-delay" value="50">
   <param key="direct-deliver" value="false">
</netty-acceptor>
<in-vm-acceptor name="in-vm" id="0">
</in-vm-acceptor>

<security-settings>
<security-setting match="#">
   <permission type="createNonDurableQueue" roles="guest">
   <permission type="deleteNonDurableQueue" roles="guest">
   <permission type="consume" roles="guest">
   <permission type="send" roles="guest">
</permission>
</permission>

<address-settings>
<!--default for catch all-->
<address-setting match="#">
   <dead-letter-address>jms.queue.DLQ</dead-letter-address>
   <expiry-address>jms.queue.ExpiryQueue</expiry-address>
   <redelivery-delay>0</redelivery-delay>
   <max-size-bytes>10485760</max-size-bytes>
   <message-counter-history-day-limit>10</message-counter-history-day-limit>
   <address-full-policy>BLOCK</address-full-policy>
</address-setting>
</address-settings>

This is the basic server configuration and the configuration of connectors and acceptors. The only difference here to the standalone HornetQ configuration is that the connectors and acceptors use bindings rather than explicitly defining hosts and ports, these can be found in the socket-binding-group part of the configuration.

For more information on configuring the core server please refer to the HornetQ user manual.
The rest of the subsystem configuration is all JMS resources. firstly you will see some JMS connection factories of which there are two types. Firstly basic HornetQ connection factories:
<connection-factory name="RemoteConnectionFactory">
<connectors>
   <connector-ref connector-name="netty"/>
</connectors>
<entries>
   <entry name="RemoteConnectionFactory"/>
</entries>
</connection-factory>

These are basically normal connection factories that would be looked up via any external client and controlled via HornetQ itself. Secondly you will see pooled connection factories, like so:
<pooled-connection-factory name="hornetq-ra">
<transaction mode="xa"/>
<connectors>
   <connector-ref connector-name="in-vm"/>
</connectors>
<entries>
   <entry name="java:/JmsXA"/>
</entries>
</pooled-connection-factory>

These are pooled connection factories and although connect to HornetQ the connections themselves are under the control of the application server. If you have previous experience with older versions of the application server this is the connection factory that would be typically defined in the jms-ds.xml configuration file.

The pooled connection factories also define the incoming connection factory for MDB's, the name of the connection factory refers to the resource adapter name used by the MDB, in previous Jboss application servers this is typically the configuration found in the ra.xml config file that defined the resource adapter.
Lastly you will see some destinations defined like so:
<jms-destinations>
 <jms-queue name="testQueue">
    <entry name="queue/test"/>
 </jms-queue>
 <jms-topic name="testTopic">
    <entry name="topic/test"/>
 </jms-topic>
</jms-destinations>

These are your basic JMS Topics and Queues where entry name is their location in JNDI.
Now lets take a simple MDB example build and deploy it and configure the server for it. A sample MDB and client can be found here and uses Maven to build. Download it and run mvn package to build the application ear file.

The example is a simple request/response pattern so before we deploy the MDB we need to configure 2 queues mdbQueue and mdbReplyQueue like so:
<jms-queue name="mdbQueue">
 <entry name="queue/mdbQueue"/>
</jms-queue>
<jms-queue name="mdbReplyQueue">
  <entry name="queue/mdbReplyQueue"/>
</jms-queue>

now restart (or start) the Application Server and copy the ear file from mdb/mdb-ear/target to the standalone/deployments directory in the AS7 installation. you should now see the mdb deployed. Now we can run the client, simply run the command mvn -Pclient test and the client will send a message and hopefully receive a message in reply.

Congratulations, you have now configured HornetQ and deployed an MDB.

Wednesday 13 July 2011

8.2 million messages / second with SpecJMS

The latest version of HornetQ as part of JBoss EAP 5.1.2 has once again been benchmarked against SPECjms2007 (c).

HornetQ is also included on JBoss AS7, which contains the same improvements we have made to achieve this performance. You will also be able to get the same performance figures with JBoss AS7.

This latest benchmark has outperformed HornetQ's latest publication by a good margin already.

With this latest result HornetQ sustained a load of about 8 million messages per second.

SpecJMS is a peer reviewed benchmark and is the first industry standard and has strict rules as to how each messaging system is configured. This is to make sure that vendors don't cheat when it comes to persistence and transactional requirements etc. SPEC is an independent corporation comprised of representatives from commercial and academic organisations. The corporation creates many industry standard benchmarks for Java amongst others. The benchmark simulates how a Message System would be used in a real world scenario.

The software supports three topologies, Horizontal, Vertical and Freeform. Only Horizontal and Vertical can be used for publishing a result. Freeform can be useful to create a custom workload to test the Messaging System for a given usecase.

Horizontal Topology is where the benchmark scales the number of Topic Subscriptions and Queues whereas a Vertical topology has a fixed number of queues but sends varying volumes of messages depending on the scale.
* The Horizontal results can be found here
* and the Vertical results here.

The scale is configured by setting the BASE configuration property value. At first glance the results can look quite confusing but here is a breakdown of the results:
- What this means in terms of actual performance:

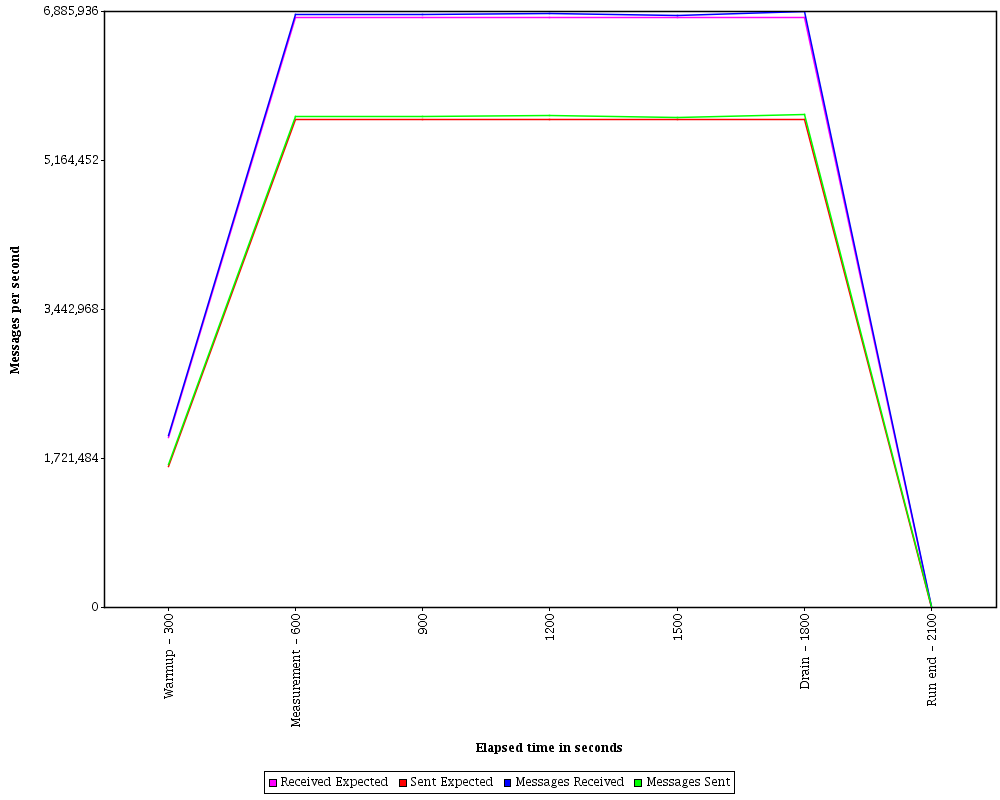
HornetQ sustained a load of about 6 million messages on the vertical topology this can be seen by looking at the following graph
Horizontal Topology Graph

Horizontally HornetQ achieved about 8 million messages per second which is shown on the runtime graph.
Vertical Topology graph
The runtime graph is used to show the following:
  • The expected versus actual message rates. These provide a quickly check the benchmark driver created enough load for the configured scale.
  • The message sent/received spread. You can expect this because topics are used in the benchmark and many clients will receive a single sent message.
  • In the Horizontal topology the spread will be greater than Vertical. Horizontal topology by it's nature has a greater distribution of messaging clients.

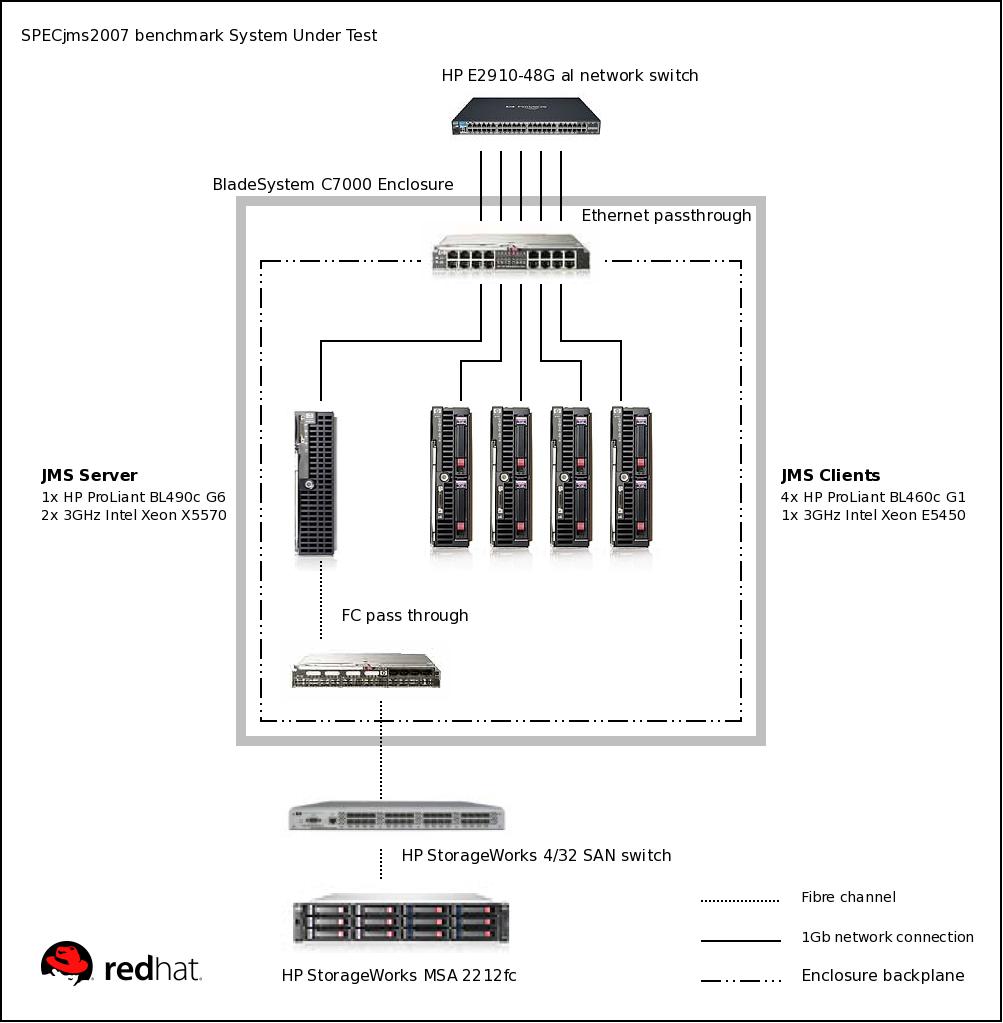
The system configuration diagram shows the hardware installation used for this result and necessary to get similar levels of performance.
System configuration

The server was a 2 chip 4 core CPU with 24576 MB of memory and a 1 GbE network interface. The client's, of which there were 4, were 1 chip 4 core CPU with 22528 MB of memory and also a 1 GbE network interface. The HornetQ journal is persisted using a networked mass storage array available to the messaging server.

A few options were set on the JVM which were as follows:

  • -XX:+UseLargePages - this enables large pages
  • -XX:LargePageSizeInBytes - set the large page size
  • -Xms and -Xmx - setting these both to 3800m stops any memory resizing delays

The following changes were made to the HornetQ Server configuration which were as follows

  • configuration.journal-min-files - this was set to a large number of files
  • configuration.thread-pool-max-size - increased level of concurrency

For more detailed information about the benchmark see the DesignDocument provided by SPEC. Additionally there is an academic paper detailing the workload characterization in greater detail.

Friday 17 June 2011

HornetQ 2.2.5 released

HornetQ 2.2.5.Final will be the first HornetQ release included in the long awaited JBoss AS7. It also contains fixes for paging performance, journal compacting and message priorities amongst others.

Thursday 5 May 2011

HornetQ is rocking out this week

Since I started working on HornetQ, this was the best week ever.

First the presentation on Judcon had a full room. Even though I suck (at least I think) on presenting, HornetQ shined out by itself as I was showing the new features and the work we have done.

Paging has a new model, more performant and non-blocking. On HornetQ 2.2.2 the syncs on paging are also batched through timers, what really improves performance on page mode also.

The atomic and transparent failover is really enterprise level.

And a lot of cool stuff!

Regarding paging, Drew Dahlke wrote a nice blog entry about how performant is paging on HornetQ on paging:

http://drewdahlke.blogspot.com/2011/05/benchmarking-hornetq-222-paging-mode.html

Wednesday 30 March 2011

HornetQ 2.2 Super-HornetQ

This is the best HornetQ release ever. HornetQ was already cutting edge but is now even better.

It is available here with docs here

This latest release contains the following improvements in functionality

- HornetQ Rest

Thanks to Bill Burke, we have a brand new and cool rest interface that's being released with 2.2.2. Look for a Judcon presentation just about this topic

- New improved failover.

Failover now support multiple backups for live servers and also allows automatic fail back to the original live server.

It also supports using shared file systems for shared journal using distributed locks to handle failover. We also guarantee that the backup server will stay completely passive until the main server crashes avoiding split brain occurring.

- New paging model

The new model now won't lock the address if you have a lazy consumer on a core-queue (or on the Topic Subscription in JMS terms) which previously caused consumer starvation. The system will navigate through page files like a cursor, keeping a soft-cache in memory to avoid duplicated references.

- Large Message Compression

It is now possible to compress the message body of large messages.

On the maintenance front thanks to the JBoss QA guys, their thorough testing means we are more confident then ever of delivering a well tested stable piece of software.

>other improvements include:

- Improvements on the journal reliability.

- Clustering reliability

- XA Integration

On the performance front we have made some optimizations:

- Optimized some non necessary syncs we were doing on the journal

- Optimized syncs on paging. Paging is now also scaling up syncs when many producers are syncing messages.

Also: HornetQ should be available for EAP users really soon, being a viable alternative for enterprise users who require a supportable alternative.

Many thanks for our contributors and for our QA department.